Stay Dry and Starry-Eyed: Add a Clear Polycarbonate Roof to Your Pergola
I love the pergola in my backyard. I like the light that the open ceiling provides. But I don't like getting rained on when I'm under it. So I found a solution that lets me have a cover from the rain and still see the sky above – clear polycarbonate roofing panels. Then all I had to do was figure out how to put a roof on a flat pergola, and I was all set!

A while ago I posted some waterproof cover ideas for pergolas because I was looking for some inspiration for covering the pergola over the grill area in my backyard.
It isn't an area that I use that much when it's raining, so you might be wondering why I need a waterproof cover for it.
After every rain, the countertop and grill are covered with leaves and bits of flowers that have to be washed off before you can use the grill again. Which makes me not want to use the grill that much 🙂
Plus, it would be nice not to get soaked if a downpour happens to come through right when I'm cooking (which seems to happen every year at my 4th of July cookout).
All that to say, I finally made a decision on what roofing to put up and got it installed. And I'm really happy with the way it turned out.
What I ended up going with is the clear corrugated polycarbonate roofing panels that you can install right over the top of your existing pergola…which is exactly what I wanted.
Keep reading to find out how to put a roof on a pergola.
Supplies
Materials
- Clear roofing panels* – I used the SunTuf 26″ x 8′ panels. They also come in 12′ lengths if you have a bigger roof to cover.
- Horizontal plastic closure strips* – These attach to the top of the pergola to hold the roofing panels on. Since they should be installed every 2 feet, you will need about 5 for every 8′ length of paneling.
- Vertical plastic closure strips* – These run along the inside of the raised part of the corrugated panels. You will need these if you want to close the gap at the edges of your pergola. Or to secure the panels to your pergola if it has ends that stick out past the main frame (like mine)
- 1″ wood screws with washers*
- 2″ wood screws with rubberized washers*
Tools
- Variable speed cordless screw driver – you will need to use low speeds to install the panels so the variable speed option is important
- 1/4″ drill bit
- 1/4″ nut driver bit*
1 | Decide Which Direction To Install The Panels
If your pergola roof has a slope or is attached to the house, the direction of the panels is determined for you. The grooves need to point downhill and away from the house.
However, if you have a free-standing pergola with a flat roof (like mine) you need to decide which way the grooves will go. Which also determines which way the water will run off.
I decided to have the grooves go from front to back, mostly because I could use 8′ roofing panels to span the whole distance without requiring any lengthwise joins.
Another consideration might be the direction that the boards on your pergola run. The horizontal closure strips need to be installed on top of parallel boards that are less than 3 feet apart. So if the boards on top of your pergola run the wrong way, you'll need to add some additional ones on top.
2 | Add Pitch To The Flat Pergola
These roofing panels are intended to be installed on a sloped roof rather than a flat one.
Since my pergola doesn't have a slope, I wanted to add something that would at least prevent the water from puddling in the middle of the roof.
The manufacturer's guidelines say the pitch should be 1 1/2″ for each foot of paneling.
My pergola roof is about 7′ wide. So to raise the roof on one end would require a 10 1/2″ drop! Which I thought would look pretty strange.
So I decided to raise the roof in the middle of the pergola instead of at one end.
By cutting the panels in half and installing a ridge cap along the top, I could shorten the length of paneling to 3 1/2′ on each side. Which with the manufacturers instructions means about a 5″ slope.
Since I live in an area that doesn't get much snow, I decided to go with even less of a slope – 1 1/2″.
To do this, I installed a 2″ x 2″ board on top of my pergola going right down the middle.

And I saved myself some money. Because the panels are flexible, they bent over that middle board without requiring any ridge caps at all.
Theoretically, I should have sealed the roofing panels along the overlaps to prevent water from leaking through. But since I'm not that concerned about making it totally water proof, I didn't bother.
If you live in an area with more snow, you may want to create more of a slope than I did. But I think you could use a similar idea by cutting the panels in half. Then installing a taller middle board, extra supporting boards at lower heights to support the panel, and adding ridge caps at the peak to seal the top.
3 | How To Install Clear Plastic Roofing Panels
If you want to see the standard installation method, this video is a good place to start:
Attach The Horizontal Closure Strips

The first step is to attach the horizontal closure strips to the top of the pergola.
For this, you'll need wood screws. They work best if they have washers on them to prevent them from pulling right through the plastic closure strips.
Line the end of one of the horizontal closure strips up with the edge of your pergola. Make sure that it is running straight along the beam.

Screw it onto the beam in the low sections of the closure strip.

When you get to the end of the first strip, attach the next strip and continue screwing it on to the beam until you get to the end of your pergola frame.
Once the first row is complete, cut off any extra closure strip with tin snips.
Then move on to the next row. Ideally, it should be 2 feet over from the first strip, but it can be up to 3 feet away.
The important thing is to make sure that you've got the hills and valleys lined up straight across from each other. Otherwise, you'll have trouble getting the corrugated roofing to lay flat like it's supposed to.
Continue adding horizontal closure strips until you get all the way across the top of your pergola.
Attach The Vertical Closure Strips

Once all of the horizontal closure strips are installed, add the vertical closure strips.
If your roof panels will end at the edge of your pergola frame, line the vertical closure strips along the end between the last raised part of the horizontal strips.

Cut the vertical closure strips to length using tin snips.

Since my pergola roof extends out beyond the frame, I used the vertical closure strips to secure the edges of the panel to the rafters that stuck out.
If you're doing this, make sure you only install the vertical closure strips on rafters that line up with the raised part of the horizontal closure strips.
Screw On The Roofing Panels
Then you're ready to start attaching your panels.
Put up the first panel so that it's lying straight across the horizontal supports and the last raised groove is running on top of the vertical strip (if you have them).
Make sure that you have the proper side up. There should be a label on the panel that tells you what side that is. Remove the label before attaching the panel.
Since my panel was a little bigger than my pergola roof, I let it overhang on both sides. That way if my roof isn't perfectly square (which I'm pretty sure it's not), I can trim the panels later to end at the edge of the pergola roof line.

Then use a quarter inch drill bit to drill holes through the panel where the screws are going to go. These screws will be installed in the raised part of the horizontal supports and along the vertical supports.
You don't need a screw in every raised section of the horizontal closure strip.

For the strips that run along the outside edges of your pergola roof, put a screw in every other raised section.
For the closure strips that are in the middle of your pergola roof, put a screw in every third raised section.

Then screw in the screws with rubberized washers using the socket bit.

The washer should be resting firmly on the plastic roofing panel, but not tight enough to cause a dimple in the panel.
When you get to the edge where the next panel will join, don't put the screws in yet.
Put up the next panel so that the first raised section of the new panel overlaps the last raised section of the old panel.
Drill holes in the new panel like you did with the first one. Then attach both the first and second panels where they overlap to the pergola frame.
Continue installing panels until you get all the way across your pergola roof.
Trim The Edges

When you're done, trim off any edges of the roofing panels using a strong pair of scissors or tin snips.
If you're sure your pergola roof is square and you're good at measuring, you could do this step before you put the panels up. Which would make it easier to cut.
But doing it after makes sure that the roof fits exactly.
And then you're finished.
This whole project of putting it up, took me less than a day. So it was a very fast and easy way to put a roof on my pergola.

I love that you can see right through the panels.
I did trim the corners a bit so that there wasn't such a big piece of unsupported roofing panel. I think that might cause issues if a big wind came along.
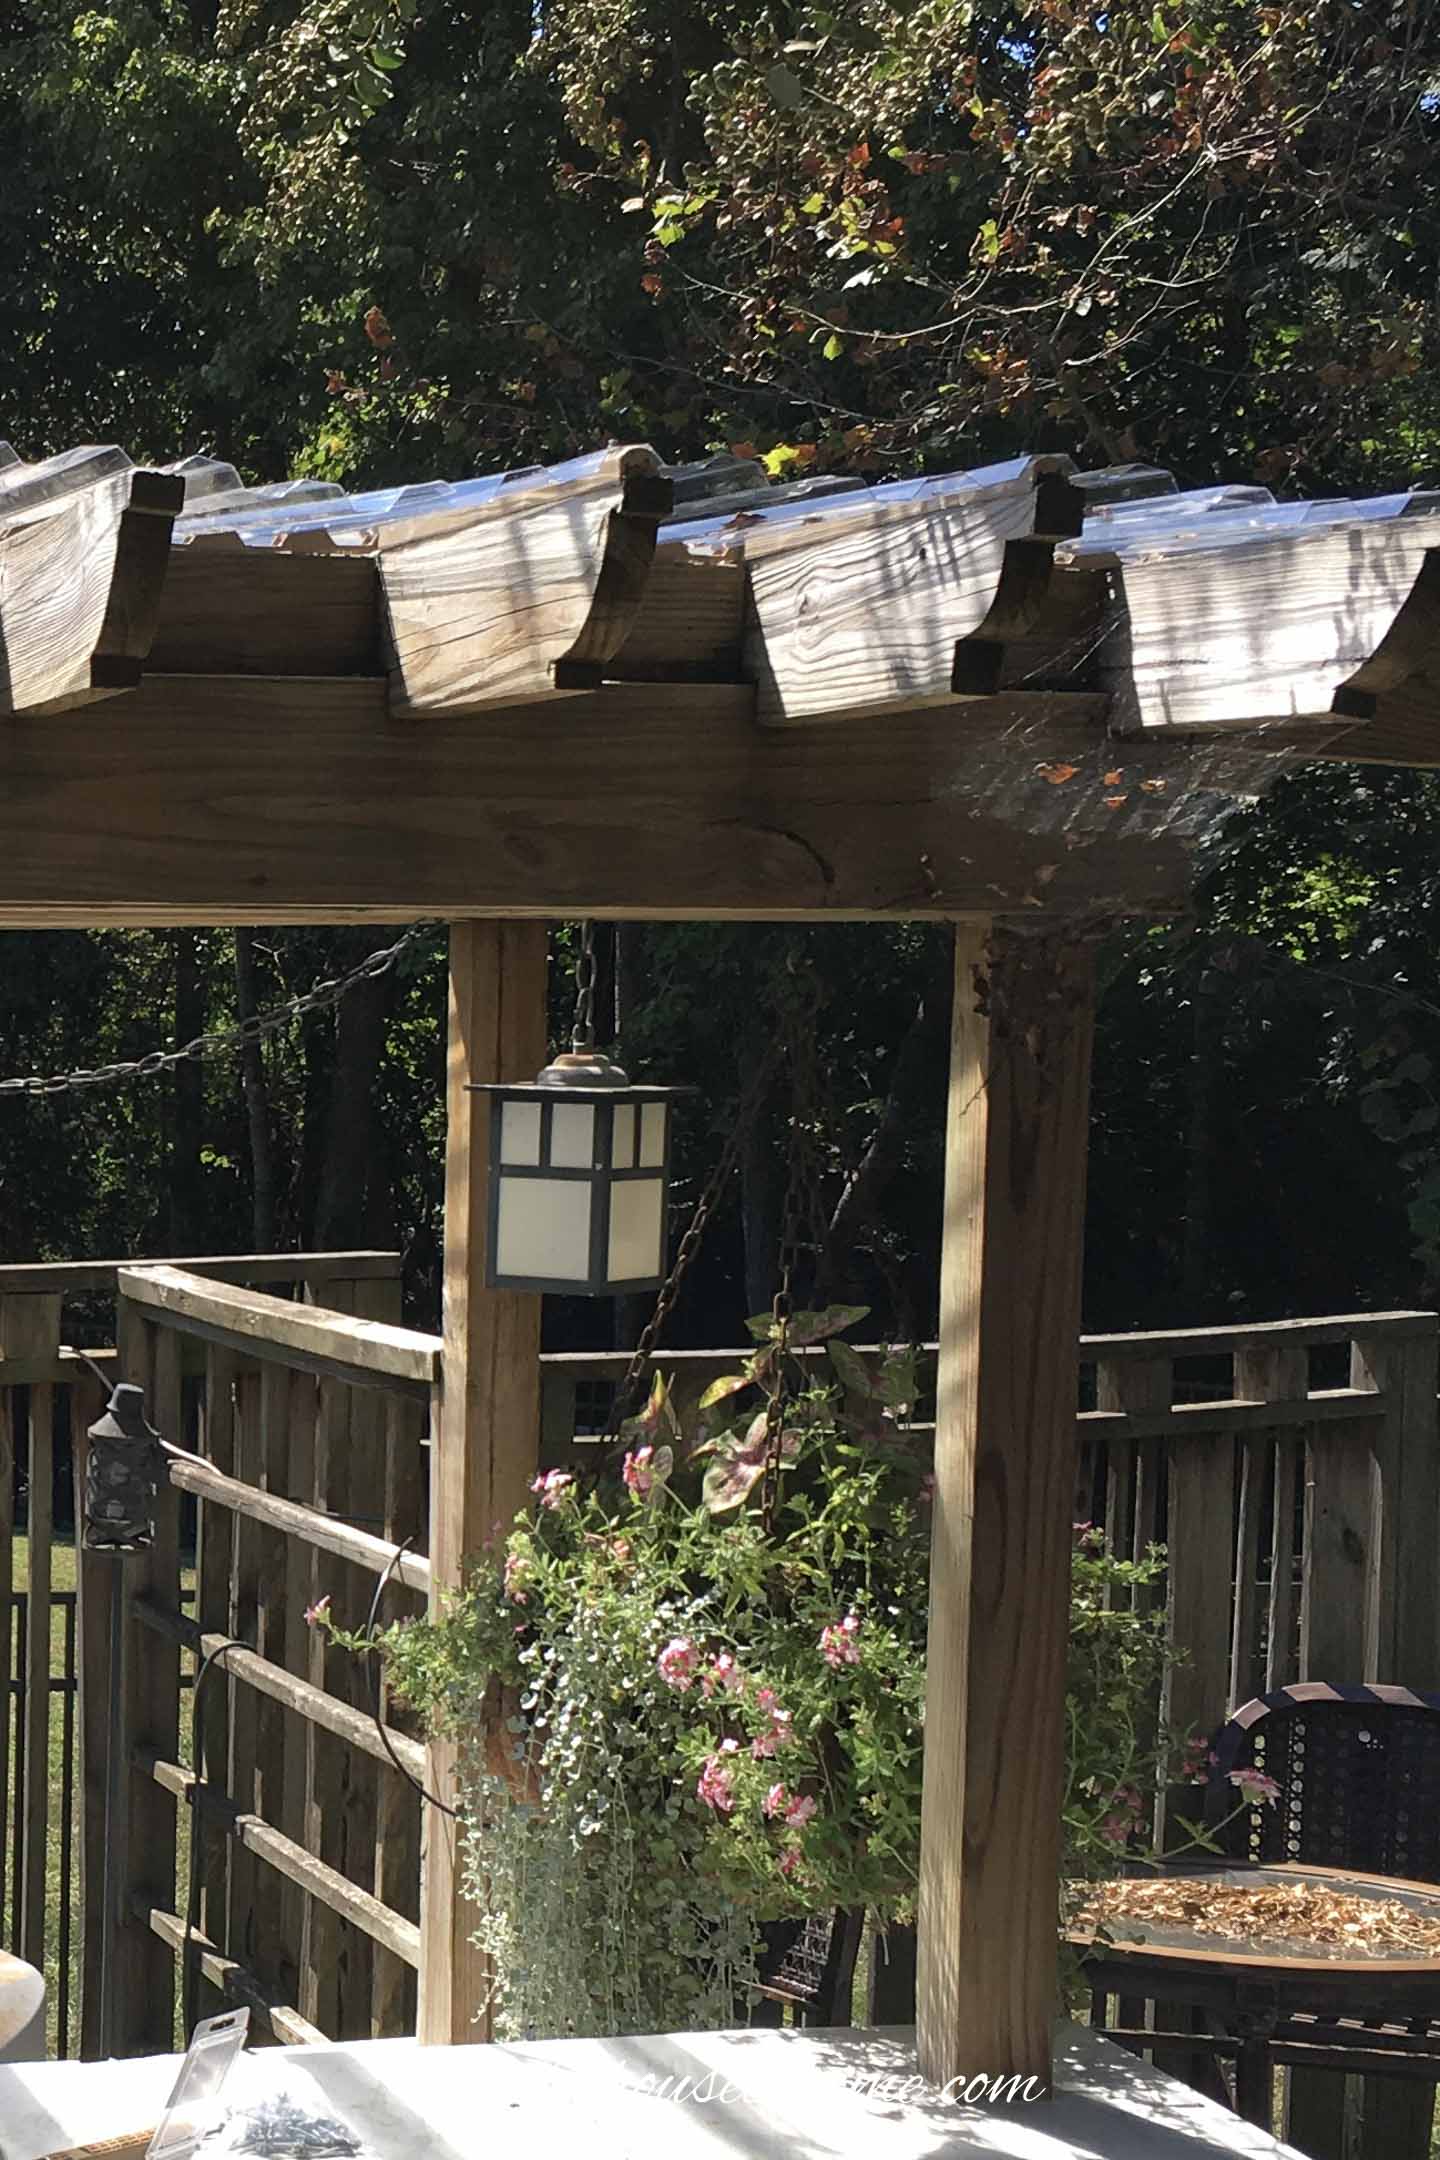
And it isn't that obvious from the front either.
I think it was definitely worth the effort!